The Eyes Have It: Clues from Vitreous Humor at Autopsy

When it comes to laboratory testing at autopsy, our options are limited compared to those for living patients. We’ve previously discussed the complexities of postmortem toxicology testing (https://labmedicineblog.com/2023/05/23/toxicology-and-forensic-pathology-more-than-a-numbers-game/) but even basic laboratory studies like a glucose or sodium level cannot be reliably measured from postmortem serum specimens. Upon death, hemolysis and cellular breakdown rapidly set in; as tissue oxygen stores and ATP are depleted, the careful balance of intracellular and extracellular electrolytes is lost, making serum essentially useless as an analyte. This makes potentially lethal conditions which leave only non-specific clues (like diabetic ketoacidosis, dehydration, or hyponatremia) difficult or impossible to prove postmortem. Fortunately at autopsy we can access a unique, relatively protected body fluid which cannot be obtained from living patients- the vitreous humor.

Vitreous humor is the clear, thick fluid which fills the globe of the eye. It is nearly acellular, composed predominantly of water with admixed hyaluronic acid and collagen proteins, and its insulated location provides it relative protection from the effects of decomposition and hemolysis. Vitreous humor is typically collected it at the beginning of an autopsy by inserting a needle into the most lateral aspect of the eye and aspirating the fluid; using this method, one can avoid collecting bits of retina (which interfere with analysis of the sample), and avoid creating any noticeable puncture marks or hemorrhages.

Years of data have shown that vitreous fluid approximates serum levels of major electrolytes, glucose, urea nitrogen (VUN), creatinine, ketones, and ethanol. Vitreous fluid is also valuable in the detection of 6-monoacetylmorphine (6-MAM), a metabolite of heroin which is quickly metabolized to morphine in the blood. Identifying 6-MAM in vitreous fluid allows us to ascertain a decedent used heroin, rather than just morphine.

While vitreous fluid is less affected by decomposition, it is not completely immune. The changes are predictable, though, and learning these patterns prevents misinterpretation of decomposition changes, and allows the pathologist to identify which results are still meaningful.

Vitreous fluid potassium will increase with the postmortem interval – in fact, this electrolyte is often touted (erroneously) as a method to determine time of death. Unfortunately there are many other variables (for example, antemortem potassium levels and rate of decomposition) affecting the rise of vitreous potassium, and this method has not proven to be the “holy grail” many were hoping for.

In contrast, vitreous sodium, chloride, and glucose levels all decrease following death – so while a low level may just be an artifact, a high level can be very meaningful. Even “low” levels should be assessed in the clinical context of the case and the concomitant potassium level. If the potassium is normal or barely elevated, it’s unlikely a “low” value is just decomposition-related.

Vitreous humor poses some challenges in the laboratory, though. Because of the thick, viscous nature of the fluid, it can be challenging to actually run it through the instrument. As decomposition progresses, the eyes can desiccate and make the vitreous humor even thicker. In cases of eye trauma, intraocular hemorrhage can contaminate the vitreous humor as well. Importantly, in situations of suspected head trauma in infants, the recovery of vitreous fluid is deferred until the end of the autopsy. Retinal and optic nerve hemorrhages are usually not identified until the brain is removed, and we need to be sure that any trauma we identify was not created artificially during the autopsy.

In summary, the use of vitreous humor as an analyte is a great illustration of creative problem solving. At autopsy the quality of blood specimens is limited, but we aren’t limited to blood. This lesson can be translated to any area of the laboratory: thinking outside of the proverbial box can lead to unexpected, paradigm-shifting opportunities.

References

Rose KL, Collins KA. Vitreous postmortem chemical analysis. NewsPath. December 2008.

Wyman J, Bultman S. Postmortem distribution of heroin metabolites in femoral blood, liver, cerebrospinal fluid, and vitreous humor. J Anal Toxicol. 2004 May-Jun;28(4):260-3. doi: 10.1093/jat/28.4.260. PMID: 15189677.

-Alison Krywanczyk, MD, FASCP, is currently a Deputy Medical Examiner at the Cuyahoga County Medical Examiner’s Office.

The Impact of ASCPi Certification

The world of medicine relies heavily on the skilled and knowledgeable hands of medical laboratory scientists. However, with globalization and a growing healthcare workforce, ensuring internationally trained scientists can seamlessly integrate into new environments is more critical and challenging than ever.

For laboratory scientists in developing countries, obtaining certification can be a life-changing event. Beyond the simple struggles of daily living, these individuals must overcome the obstacles and difficulties that students in the U.S. rarely (if ever) have to face. Yet still, they seek to prove their knowledge and worthiness by seeking international certification.

ASCP is at the forefront of certifying laboratory scientists in developing countries by offering the ASCPi exam. There are few opportunities for students in second and third-world countries to get the quality training and experience to pass the exam. These students come with diverse life experiences and needs but are still passionate about working in the lab.

I discussed the importance of the ASCPi certification with Marion Carrilo, MS, MLS (ASCP), the visionary founder of Trinity Blood Solutions in Trinidad and Tobago in the West Indies, about the reasons why and the need for certification and how the ASCPi is bridging the gap for international laboratory scientists.

Hi Marion, thanks for talking with me today. First, can you describe your typical student?

The typical individuals pursuing MLS ASCPi certification are experienced medical laboratory technologists/technicians. Many of them have worked in the field for at least five years. They love the profession and want more out of it.

In Trinity’s ASCPi Exam Prep, I get some MLTs who have never done an MLT program but want the theory so they can get up to speed with their colleagues who completed an MLT program. These are not typical individuals and they usually have a degree in biological science and are practicing MLTs.

Why do the students choose to take the ASCPi exam?

Reasons for taking the ASCPi exam will vary according to the region and according to the state of affairs for medical laboratory technologists. In many countries, taking and passing the MLS ASCPi is the first step to migrating to the USA as a medical laboratory tech. People migrate due to poor salaries, bad working conditions, and no or limited opportunities to advance in the profession.

In the Caribbean, taking the MLS ASCPi exam after graduating from an MLT program is not routine. Every country has its criteria for being able to practice in a medical laboratory, and in many cases, it is sufficient to graduate from a local MLT program and/or be registered with a local MLT association or board. ASCP is not yet a household name in the Caribbean, so many who pursue taking the exam do it to migrate. Others take the exam for professional advancement.

Migration to the U.S. or another developed country provides them with better opportunities for professional and personal development. In the U.S., the pathway to professional advancement is sure if you work hard. In developing nations, working hard does not guarantee good success.

Professional advancement can be a promotion to a supervisory role or being able to show the credentials of international certification. In some cases, medical laboratory technologists may have been encouraged to get certified by another colleague who is ASCPi certified.

What are the benefits to the lab of having ASCPi techs?

Whether an individual prepares for the exam on their own or enroll in an exam preparation course, they are exposed to systems and procedures not used in their country. This new exposure encourages those techs to be more conscientious in their practice. Having ASCPi techs helps to maintain laboratory accreditation because the new knowledge now gives them an appreciation for working in quality systems. It also encourages the certified tech to share what they learned through preparation with their colleagues.

What do you think the ACSP should or would like them to do to help international students achieve certification?

Recently, a certified individual told me that making the BOC page more intuitive for international candidates will make ASCPi certification info easier to find and understand.

This never occurred to me because I’ve used it for so long. I agree that the BOC page can be intimidating. An example would be displaying the routes in a table form as opposed to the drop-down menus. Have a dedicated page with only the necessary information for the international candidate. So removing newsletter, BOC eligibility Assistant, Categories of certification etc., U.S certification.

Last month, ASCPi BOC created a new Caribbean Advocacy Team. This team will help to provide ASCP BOC with information about how they can best promote certification in the region. As mentioned before, each region has a specific culture concerning the profession, so having Advocacy Teams in various regions is a great gesture.

I really appreciate you providing your experience with our readers. Do you have any final thoughts you would like to share?

It is a great feeling to know ASCP BOC is providing opportunities for techs to advance globally. Some may say they are contributing to the brain drain of a country, and I’m afraid I have to disagree. Instead, they are providing opportunities for advancement as a tech that are not available in the international candidate’s country.

Migration is an expensive process, so not everyone who becomes certified will leave, although they may have planned to do so initially. Even those who leave may return and help their country or provide assistance to their home country from their new home abroad.

Advancement cannot only be seen as moving up a career ladder; it must be seen holistically. A tech working 12 hours 6 days per week and not being paid enough to provide a reasonable level of comfort for their family stymies the work that tech will do and their mindset about the profession. ASCPi provides a way for these techs to move out of such systems and advance holistically in a profession they love.

The ASCP is doing its part to ensure that there are well-trained medical scientists in the world’s laboratories who can provide accurate and timely results for patient care. Passing the ASCPi exam can be, and has been, a life-changing event for scientists working under the most stressful life conditions worldwide. By bridging the knowledge gap and fostering a culture of excellence, the ASCPi is paving the way for a brighter future in laboratory medicine throughout the world, one well-equipped scientist at a time.

Darryl Elzie is a Quality Consultant for Inova Blood Donor Services. He has been an ASCP Medical Technologist for over 25 years, performing CAP inspections for 15+ years. He has held the roles of laboratory generalist and chemistry senior technologist. He has a Master’s in Healthcare Administration from Ashford University, a Doctorate of Psychology from The University of the Rockies, and is a Certified Quality Auditor (ASQ). Inova Blood Donor Services is the largest hospital-based blood center in the nation. Dr. Elzie is also a Counselor and Life Coach at issueslifecoaching.com.  

Microbiology Case Study: A 53 Year Old Male with Malaise, Bilateral Flank Pain and Decreased Urine Output

Case History

A 53 year old male presented to the emergency department with a one-day history of malaise, bilateral flank pain and decreased urine output. His past medical history was notable for decompensated cirrhosis due to alcohol use disorder complicated by esophageal varices and gastric ulcers, peritoneal ascites, several recent episodes of upper GI bleeding, monoclonal gammopathy of unknown significance, and remote prostate cancer status post prostatectomy. Oral history indicated the patient was actively drinking shortly before presentation and had recently consumed oysters on the half shell, broiled shrimp, and crab meat. While being seen in the emergency department, the patient quickly progressed to septic shock.     

Admission laboratory studies demonstrated severe metabolic acidosis, pancytopenia, and acute renal failure. Initial CT abdomen/pelvis demonstrated cirrhotic liver changes, varices, distal esophageal wall thickening, bilateral perinephric fat stranding extending into the pelvis and perivesical fat. The patient was admitted to the MICU for intubation/mechanical ventilation and administration of multiple pressors, as well as empiric meropenem, vancomycin and micafungin given concern for septic shock.Initial blood cultures drawn in the ED flagged positive with gram negative rods (both aerobic and anaerobic bottles) less than 24 hours after collection.

Laboratory Identification

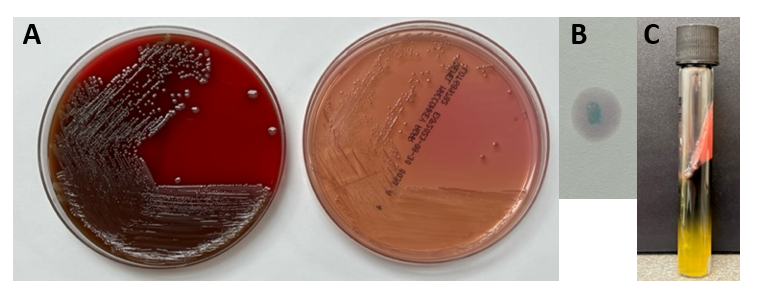
Blood cultures were processed for culture workup and molecular identification. No identification was able to be established using a commercial multiplex PCR-based molecular panel on the positive blood culture broth. Subsequent growth of the organism on MacConkey agar 18 hours later revealed non-lactose fermenting colonies (Image 1A). The organism was oxidase-negative, positive for catalase and indole (Image 1B) and exhibited hydrogen sulfide production when inoculated on triple sugar iron (TSI) media. The organism was definitively identified as Edwardsiella tarda by MALDI-TOF MS and was broadly susceptible to all antibiotic tested including beta-lactams and fluoroquinolones.

Discussion

Edwardsiella tarda is an infrequently isolated member of the Enterobacterales which is most often associated with gastroenteritis. Reports of additional presentations include peritonitis, intra-abdominal abscess, and wound infections are increasing.1 Bacteremia is rare, and can lead to cholangitis, cholecystitis, and liver abscess via hematogenous spread.     Patients of advanced age (>65 years) and those with hepatobiliary diseases including liver cirrhosis and alcohol abuse and iron storage disorders are at increased risk for extraintestinal disease..2 Colonization of the gastrointestinal tract is believed to be a precipitating even leading to bacteremia. Cases of gastroenteritis are usually self-limiting, although ciprofloxacin or trimethoprim/sulfamethoxazole can be utilized in cases of prolonged duration.5 Prompt and accurate diagnosis of E. tarda bacteremia is important as this presentation is associated with an elevated mortality rate,4 particularly among those with liver disease.     

As members of the Enterobacterales, Edwardsiella sp. share common biochemical features of other members of the order including being catalase-positive and oxidase-negative. Oxidase negativity aids in the distinction between E. tarda and Aeromonas/Plesiomonas, both species which are also associated with aquatic environments and cause gastrointestinal infections.5 E. tarda is non-lactose fermenting and reduces sulfur containing amino acids to hydrogen sulfide. This can result in confusion with members of the genus Salmonella4 as colonies exhibit similar appearances on medias including Hektoen Enteric agar and Xylose-lysine deoxycholate agar formulated for recovery and presumptive identification of Salmonella from gastrointestinal specimens. Importantly, E. tarda is also indole-positive which will biochemically differentiate these two genera.

E. tarda is associated with freshwater or brackish aquatic environments. This organism is a well-known pathogen in aquaculture industries causing serious infections in fish and significant economic loss. As such, vaccines and prophylactic antibiotics are utilized to prevent E. tarda infection among aquatic animals, and diagnostic approaches including specialized multiplex PCRs are available. Human infection is often associated with consumption of contaminated fish and seafood, and diagnosis is almost exclusively dependent on microbiological culture by contrast. Clinical multiplex molecular panels for both gastrointestinal and bloodstream infections lack the ability to detect E. tarda. In this patient’s case, recent consumption of seafood serves as the most likely event leading to E. tarda gastrointestinal colonization and is consistent with previously reported cases of E. tarda bacteremia.3 The patient was treated with meropenem eventually narrowed to piperacillin/tazobactam and blood cultures cleared. He was weaned off pressors and extubated.     Unfortunately, the patient decompensated over the course of three weeks due to worsening shock and acidosis. He was moved to comfort care and expired soon thereafter.

References

  1. Hirai et. al. 2015.  Edwardsiella tarda bacteremia. A rare but fatal water- and foodborne infection: Review of the literature and clinical cases from a single centre. Can. J. Infect. Dis. Med. Microbiol. 26(6): 313-318.
  2. Hasegawa M., and Sanmoto, Y.  2024. Recurrent cholangitis and bacteremia due to Edwardsiella tarda: a case report.     Oxford Med. Case Rep. Volume 2024, Issue 1, January 2024, omad148, https://doi.org/10.1093/omcr/omad148
  3. An et. al.     2023.     Case Report: Disseminated Edwardsiella tarda infection in an immunocompromised patient.     Front. Cell. Infect. Microbiol. 20 November 2023.
  4. Janda, J.M, and Abbott, S.L. 1993. Infections Associated with the genus Edwardsiella: the Role of Edwardsiella tarda in human disease. Clin. Infect. Dis. Oct;17(4):742-8.
  5. Janda, J.M and Abbott, S.L. 1999. Unusual Food-Borne Pathogens: Listeria monocytogenes, Aeromonas, Plesiomonas, and Edwardsiella species. Clin. Lab. Med. 19(3):553-582.

-Andrew Clark, PhD, D(ABMM) is an Assistant Professor at UT Southwestern Medical Center in the Department of Pathology, and Associate Director of the Clements University Hospital microbiology laboratory. He completed a CPEP-accredited postdoctoral fellowship in Medical and Public Health Microbiology at National Institutes of Health, and is interested in antimicrobial susceptibility and anaerobe pathophysiology.

-Francesca Lee, MD, is an associate professor in the Departments of Pathology and Internal Medicine (Infectious Diseases) at UT Southwestern Medical Center

Happy Medical laboratory Professionals Week! A Trip Down Memory Lane

When I think of Lab Week, I think of all the Lab Week celebrations we’ve had in the past: Food, games, from “Guess whose baby picture?” to word searches and coworker trivia, and of course, more food. I’ve seen the same games over and over, but with new coworkers they’re always fun. Probably the most unique game I’ve seen, was “whose sample is this?” Smushed chocolate candy bars were stuffed into sample cups (and looked like you know what) and we had to guess which ‘sample’ came from which candy bar. Lab week also helps us remember the techs we’ve worked with in the past and the good times we’ve had in the lab and outside. And, of course, Lab week always seems to bring up reminiscing, and the question “Remember when?”

As a nod to lab week, I’d like to take you on a little trip down memory lane. Those of us who have been around for a while can laugh and add our own stories. The new techs in the lab, the younger generation will look at us and say “No way!”” or “You’re joking, right?”

I work in a lab that is very fortunate to have a few wonderful techs in their late 60’s and 70’s who still work for us part time. But anyone who has passed through our lab in the past 60 years remembers Irene, who is over 80, and has been here since 1963. That’s before many of us were born! Now Irene doesn’t work every day, or even every month, but she’s there for our students and newly graduated employees when we can use her talents for a few days. She has boxes full of teaching slides and comes in to review WBCs and RBC morphology with them and shares many stories about ‘the old days’ in the lab. Recently she was talking to a new grad and mentioned the old lab and the rabbits they kept in the lab.

“Rabbits?’ he asked.

“Yes, youngster, let me tell you about it.”

Rabbits were used for the first pregnancy tests. The first HCG tests came out in the early 1970’s, but before then, the question “Did the rabbit die?” was associated with a positive pregnancy test. Young rabbits were injected with urine or blood from a woman, and several days later, the animals were dissected to look for enlarged ovaries, a sign that HCG was present in the injected specimen, and a positive pregnancy test. So, in reality the rabbit (or mouse, or frog) always died, whether the woman was pregnant or not.

I fortunately missed the live animals in the lab era. Now that I’m working with techs who are younger than my kids (and not that much older than my grandkids!), when us ‘old timers’ talk about what the lab used to be like, we get incredulous wide-eyed stares.

 “You didn’t wear gloves??”

“They drank coffee in the lab?”

“No computers?”

In my very first job out of college I worked in a hospital lab, and trained in Hematology, Chemistry and Blood Bank. It was the time of the rise in automation, and we had some great ‘new’ analyzers. We had a Coulter S in hematology, the first automated hematology analyzer. The Coulter S offered 7 parameters. In about 1 minute it could analyze and report the WBC, RBC, Hgb, Hct, MCV. MCH and MCHC. Before this we had to prepare samples, lyse RBCs to count WBCs, perform hemoglobin measurement on a spectrophotometer, and calculate the indices! If a physician wanted a differential, we stained slides by hand and counted a 100-cell diff. Platelet count counts fortunately were not ordered on every CBC because those were counted manually!

I remember training in the chemistry department with a lot of instruments which each did only one or 2 tests. Individual tests were done on single test analyzers. Which meant a lot of techs in the lab, and you could be assigned to a bench where you did just Na and K on the flame photometer or just Glucoses and BUNs on single test analyzers all day. We did have a STAT analyzer which did electrolytes, glucose and BUN, and a larger analyzer that did 12 test panels, but they were only used when the full panels were ordered. These multi test analyzers were new and exciting, but in 1980 we were still uncapping and pouring off all our samples by hand. Without gloves!

“What?? No gloves?”

No gloves. We drew blood and worked in the lab with no gloves. Analyzers had glass coils that techs changed with their bare hands, and there were accidents. Techs contracted hepatitis and in the 1980’s the fear of contracting HIV was real. It wasn’t until 1992, when the Occupational Health and Safety Administration (OHSA) published the Bloodborne Pathogens Standard. There was increased awareness of HIV, and OHSA implemented universal precautions to protect workers who may come in contact with bodily fluids. OSHA’s standard required employers to provide personal protective equipment, including disposable gloves.

I once read an article that said that medical technician/technologists were the profession that drinks the most coffee. Now, I don’t know about that because I don’t drink coffee, but what they didn’t mention in the article was that they used to drink it in the lab! Yes, the cup of coffee often sat next to the microscope while doing diffs. And remember, no one wore gloves. I remember a doctor walking through the lab smoking a cigar. And while I don’t remember if I ever saw eating in the lab, I’m pretty sure it happened. These things are so taboo to us now that sometimes we wish we were camels because we often go for hours without a sip of water! We may have been the profession who drinks the most coffee, but today we may be the most dehydrated because the closest ‘clean ‘area to get a drink is way down the hall! And we’re too busy to leave our work and go get a drink!

People often use the term ‘The Good Old Days’ when talking about the past, but in the lab, these times weren’t always ‘good’. Yes, we had good times. But there were also practices that weren’t what we would today consider safe. Besides the lack of gloves, and coffee in the lab, there was also mouth pipetting. Remember spit strings? Techs kept them in their pockets for use in mouth pipetting body fluids (shudder). We washed glassware, even literally rinsing blood out of test tubes and reusing them.

We also love to reminisce about obsolete lab tests. I remember when AST, LDH and CK were used for markers of myocardial infarction. Then we had a new test, the CK-MB, which is now designated antiquated and has been replaced by cardiac troponin I for diagnosing MI. Bleeding times were once widely used as a platelet function test. Today this rather crude test is rarely used and not even offered by many labs. Glass in the lab has been replaced by plastics from vacutainer tubes and blood bags to graduated cylinders and beakers. We no longer count platelets on a hemocytometer because our automated analyzers perform platelet counts. In Urinalysis, we used to do confirmatory tests for glucose, bilirubin and protein in urine. And so many more tests that have been replaced by newer and better testing. What is your favorite or no so favorite ‘obsolete’ lab test?

We’ve certainly come a long way in the last 60 years! Lab Week is a great time to generate new awareness and excitement about the laboratory medicine profession while having some fun with your lab coworkers. Thanks to everyone who is part of the laboratory team for your hard work and dedication. Happy Laboratory professionals Week!

DOWN
1. favorite drink to sip at the microscope while doing diffs
2. standard PPE that wasn’t so standard before 1990
3. standard set of guidelines for prevention of bloodborne pathogens

5. old confirmatory test for urine bilirubin
8. type of pipetting common in the old days
9. you probably won’t use one of these for heating in the lab today
10. historic method for testing for glucose in urine
11. animal kept in lab for pregnancy testing
12. old school test for MI
14. plastic blood collection bags have replaced these

ACROSS
4. used to draw blood before vacutainers
6. carried in your pocket as a pipetting aid
7. used for manual platelet counts
13. obsolete platelet function test
15. dark field microscopy was first test for diagnosis of this STD in 1906

Socha-small

-Becky Socha, MS, MLS(ASCP)CMBBCM graduated from Merrimack College in N. Andover, Massachusetts with a BS in Medical Technology and completed her MS in Clinical Laboratory Sciences at the University of Massachusetts, Lowell. She has worked as a Medical Technologist for over 40 years and has taught as an adjunct faculty member at Merrimack College, UMass Lowell and Stevenson University for over 20 years.  She has worked in all areas of the clinical laboratory, but has a special interest in Hematology and Blood Banking. She currently works at Mercy Medical Center in Baltimore, Md. When she’s not busy being a mad scientist, she can be found outside riding her bicycle.

Violence in the Laboratory

The field of laboratory safety is very obviously about the protection and well-being of those who work within the labs. The topics of study within this field typically include chemical hygiene, biohazard safety, and even emergency management. One area of focus that historically has not been discussed under the lab safety umbrella, though, is workplace violence. Unfortunately, this topic definitely needs attention and a place among the other safety subjects.

Teaching laboratory staff how to recognize workplace violence (WVP) is important, and the activities that define acts of such aggression are numerous. The National Institute of Occupational Safety & Health (NIOSH) defines WVP as “any violent act, including physical assaults and threats of assault, directed toward team members at work or on duty and include physical injury, threats, abuse, hostility, harassment, discriminatory language/behavior and other forms of verbal violence that can potentially escalate to physical violence.”

The definition is important so staff can identify it, respond to it, and report it. A higher priority, however, is not only to learn the tools that will help staff recognize when potential threats at work arise, but to also be able to de-escalate a tense situations and mitigate any violence altogether. Teach laboratorians to pay attention signs of aggression such as disruptions, outbursts, throwing objects or threatening gestures.

Employees should be taught to respond to growing violence threats by remaining calm, listening, and by demonstrating empathy. Responding to people by yelling or getting into their personal space will only escalate the situation. Your tone of voice, the volume of your voice, your facial expressions and your posture all give signals to the person who is agitated, and if you respond inappropriately with these non-verbal cues, the situation could get worse. Training staff to de-escalate these situations can go a long way toward preventing certain violent incidents before they occur.

Unfortunately, part of the WVP program must be responding to active shooter threats. The Federal Bureau of Investigation (FBI) offers “Run-Hide-Fight” training that helps employees know how to respond when an active shooter situation arises. * There are details in the response that must be considered ahead of an incident. If you can run to an area of safety without getting hurt, go quickly, but do not try to coerce co-workers or patients to come with you. In these situations, you must first consider only your own safety if you wish to survive. If you are in a situation where you can hide in a safe place, be sure to turn off your phone and other electronic devices. Incoming calls can make noises which can alert the shooter to your position. If you must fight, use whatever you can find as a weapon, and fight to win. Do not give the shooter any opportunity to fire his weapon.

The laboratory may follow a facility WVP plan or it may create its own, but there should be a safety plan in place for such situations. Be sure to establish a strategy to identify and address the factors that contribute to violence throughout the workplace. Allow for and ensure prompt and accurate reporting of all incidents of violence including those that involve no physical injury. Empower leaders and employees with the necessary tools to eliminate violence in their areas.

The faster workplace violence can be detected, the sooner a good response may occur. However, as with personal wellness planning, prevention is always a solid approach. Avoiding violent situations altogether can be a part of the lab culture with regular education and training. Make sure there is a strong Workplace Violence Plan in action in your laboratory.

*https://www.fbi.gov/video-repository/run-hide-fight-092120.mp4/view

Dan Scungio, MT(ASCP), SLS, CQA (ASQ) has over 25 years experience as a certified medical technologist. Today he is the Laboratory Safety Officer for Sentara Healthcare, a system of seven hospitals and over 20 laboratories and draw sites in the Tidewater area of Virginia. He is also known as Dan the Lab Safety Man, a lab safety consultant, educator, and trainer.

Introduction to Shotgun Wounds

We’ve previously addressed the basics of gunshot wounds (see https://labmedicineblog.com/2023/09/22/the-ins-and-outs-of-gunshot-wounds/) but forensic pathologists need to be familiar with injuries inflicted by a variety of firearms. If you grew up in a rural area (like me) you are probably familiar with shotguns as a typical hunting tool. However, shotguns also have several unique characteristics which are crucial for forensic pathologists to understand.

First, the barrel of a shotgun is most often a “smooth bore” as opposed to the longitudinal spiraling lands and grooves (or “rifling”) found in the barrels of rifles and handguns. This means traditional ballistic “matching” (testing to see if a bullet was fired from a particular weapon) is impossible.

Secondly, shotgun ammunition is constructed differently. Broadly speaking there are three types of shotgun ammunition – birdshot, buckshot, and slugs (from smallest to largest in individual size).

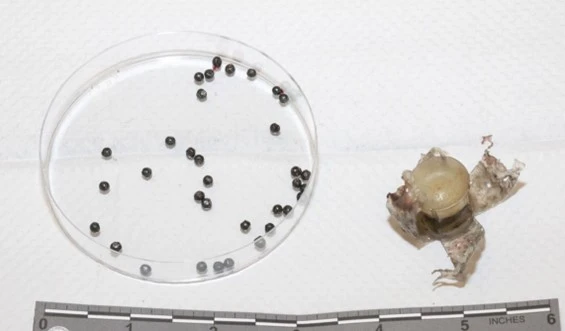
A single shotgun projectile is composed of the ‘shell’, an outer casing of plastic with a metal base. The shell contains primer and gunpowder, “wadding” (fiber or cardboard material), and a plastic “sleeve” which holds the projectile(s) (or “shot”). The individual characteristics can vary depending on the “gauge” (caliber) used, but a single shell will typically contain hundreds of birdshot pellets, tens of buckshot pellets, or one slug. The sleeve initially holds these individual pellets together – but upon leaving the barrel, the plastic flays outward, and the pellets or slug are released. For birdshot and buckshot, this means the individual pellets begin to spread apart and lose speed.

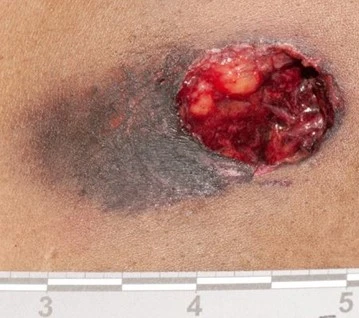
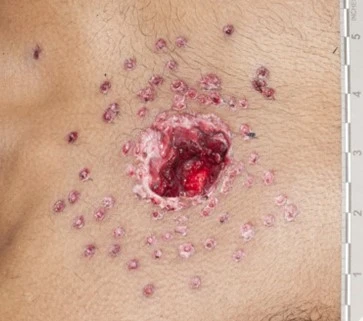
This spread of pellets explains why shotguns are a popular choice for hunting birds – a small, constantly moving target. It also helps us determine the range of fire from the shape of the entrance wound. At a close or contact range, there is minimal opportunity for the pellets to spread, resulting in a single circular wound. As the distance from the target increases to several feet, the wound edges become scalloped and individual pellet wounds are observed around the main entrance wound. At a distant range (approximately ten feet), there are only individual pellets wounds. Importantly, these wound characteristics can only be assessed on the skin surface – not on radiographs, which will only show the pellets in their final location within the body.

The other components of the shell can add to the wound characteristics. At contact range, the plastic sleeve (and even the shell) will enter the body but will likely not be visible by radiograph – these still need to be recovered as evidence. At medium distances, the sleeve and/or shell may strike the skin surface and impart a distinct patterned abrasion, without penetrating the skin.

Fortunately, shotgun wounds are a less common part of day-to-day practice – yet it is still important to be prepared with a basic understanding of how these weapons function and the diverse types of ammunition available.

The petri dish on the left holds a representative sample of birdshot pellets, recovered from a contact-range shotgun wound. The plastic sleeve (right) was also in the wound – note the opened flaps.
This contact-range gunshot wound is large and circular, although there is still some faint scalloping of the edges. The black discoloration to the left is caused by searing of the skin from the hot gas exiting the shotgun barrel.
This intermediate-range shotgun wound has a central main wound with scalloped edges and surrounding satellite entrance wounds caused by the pellets beginning to spread.
At distant range, all the pellets have dispersed. At this range the pellets have lost energy, and the wounds are often superficial; however, depending on the location of the injury on the body, even single pellets can cause lethal trauma.
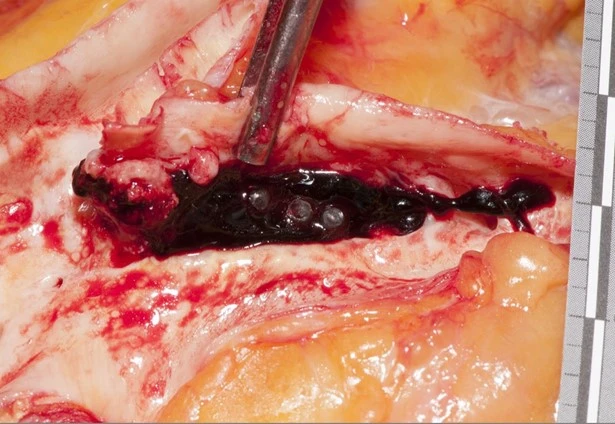
The dispersal of individual pellets within the body can lead to unexpected findings. In this autopsy, the decedent had a self-inflicted shotgun wound to the chest with birdshot. A few pellets entered the aorta near the arch, and several embolized down the length of the aorta before lodging in the right iliac artery (shown here). This illustrates why the spread of pellets should only be assessed on the skin surface, and not based on radiographs.

References

DiMaio, Vincent J. Gunshot Wounds. 3rd ed., CRC Press, Taylor & Francis Group, 2016.

Dolinak, et al. Forensic Pathology: Principles and PracticeElsevier Academic Press, 2005.

-Alison Krywanczyk, MD, FASCP, is currently a Deputy Medical Examiner at the Cuyahoga County Medical Examiner’s Office.

Microbiology Case Study: A 72 Year Old Male with Postoperative Fever

Case description

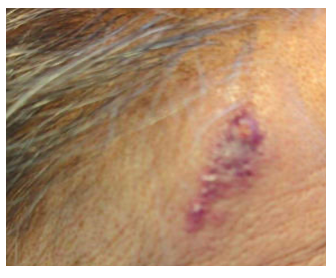
A 72 year-old male with severe aortic stenosis resulting in heart failure underwent aortic valve replacement and became febrile with mild shortness of breath on post-operative day one.  Additional pertinent medical history includes end-stage renal disease secondary to diabetic nephropathy with kidney transplantation seven months prior which was complicated by delayed graft function requiring hemodialysis and immunosuppression. The patient’s presentation was suspicious for either a post-operative fever or a complication of hemodialysis. Physical examination did not suggest infection at either the surgical site or his arteriovenous fistula. A chest CT revealed a moderate, loculated left pleural effusion with left lower lobe atelectasis and nodular consolidations in the right lung, raising concern for pneumonia. A bronchial biopsy was obtained, and histopathological evaluation was consistent with an abscess, but no organisms were visualized. Culture from a left bronchial brushing was also obtained at the same time. Two days later, the patient developed a progressively enlarging forehead lesion (Image 1).

Image 1. Progressively enlarging forehead lesion. Microscopic evaluation following biopsy of the lesion revealed organisms morphologically consistent with Nocardia  species.

Laboratory Identification

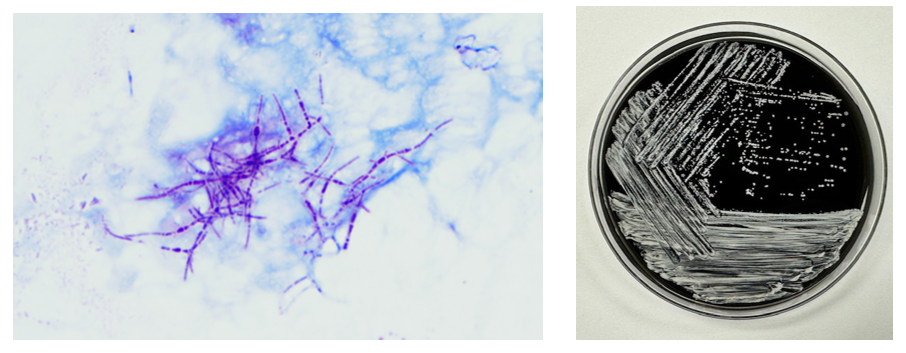
Microscopic evaluation of the biopsy of the lesion for culture revealed branching, beaded gram positive filamentous bacteria which stained positive using a modified acid-fast stain, suggestive of Nocardia species. This was corroborated by the bronchial culture, where similar modified acid-fast organisms were visualized and grew chalky white colonies identified as Nocardia sp. by MALDI-TOF MS (Image 2). The isolate was referred to a reference laboratory for definitive speciation and antimicrobial susceptibility testing, and the patient was started empirically on ceftriaxone and trimethoprim/sulfamethoxazole.  Speciation and susceptibility testing subsequently identified the organism as Nocardia brasiliensis with susceptibility to both ceftriaxone and trimethoprim/sulfamethoxazole, and treatment was thereafter continued for 40 days.

Image 2. Modified acid-fast stain of a bronchial culture from the patient showed a branching, modified acid-fast rods consistent with Nocardia.  Cultures of both the lesion and bronchial brushing revealed white, chalky colonies on buffered charcoal yeast extract agar consistent with Nocardia sp.

Discussion

Nocardia is a saprophytic bacterium that is commonly found in soil worldwide. Gram staining of Nocardia sp. usually reveals delicate, weakly or erratically staining, beaded, branching Gram-positive rods. There are currently 130 known species of Nocardia,1 of which more than 50 have been reported to have clinical relevance.2 Disease due to Nocardia is known to occur due to inhalation of the organism from the environment or traumatic inoculation. It is thought to be an opportunistic pathogen most commonly affecting immunocompromised patients3 like the patient in this case.

Manifestations of nocardiosis vary widely depending on the species responsible, with most common presentations being lymphocutaneous, pulmonary, or disseminated disease. Here, we present a patient who displayed both lymphocutaneous and pulmonary forms of Nocardia infection. While prognosis is poorer in immunocompromised patients, with appropriate treatment, recovery rate is high in both lymphocutaneous and pulmonary forms, unlike in disseminated disease, where studies have found mortality rates between 44% to 85%.4

Diagnosis of Nocardia infections is mainly performed through either direct visualization of the organism or through culture. The modified acid-fast stain is commonly performed but has limited sensitivity and should generally be performed in conjunction with the Gram stain.5 Recovery in culture is most reliable from respiratory and/or tissue samples, while blood culture, by contrast, has poorer yield. While some strains, as in this patient, appear within several days in culture, some strains may take up to 2 to 3 weeks to detect5 necessitating extended incubation and consultation with the clinical laboratory.

Treatment requires prolonged courses of antibiotics. Susceptibilities vary by species, making it important to obtain species identification to identify appropriate therapy to guide empiric therapy. Susceptibility testing is performed to allow further tailoring of antibiotic regimens. In this case, the patient was treated with a combination of trimethoprim/sulfamethoxazole and ceftriaxone, both of which cover the majority of clinically relevant Nocardia species, until susceptibility testing revealed that the empiric treatment provided adequate coverage for the Nocardia brasiliensis identified, supporting continuation of the chosen empiric regimen.

References

  1. Genus Nocardia. List of Prokaryotic names with Standing in Nomenclature. https://www.bacterio.net/genus/nocardia (2023).
  2. Hamdi AM, Fida M, Deml SM, Abu Saleh OM, Wengenack NL. Retrospective Analysis of Antimicrobial Susceptibility Profiles of Nocardia Species from a Tertiary Hospital and Reference Laboratory, 2011 to 2017. Antimicrob Agents Chemother. 2020 Feb 21;64(3):e01868-19. doi:10.1128/AAC.01868-19.
  3. McNeil MM, Brown JM. The medically important aerobic actinomycetes: epidemiology and microbiology. Clin Microbiol Rev. 1994 Jul;7(3):357-417. doi:10.1128/CMR.7.3.357.
  4. Traxler RM, Bell ME, Lasker B, Headd B, Shieh WJ, McQuiston JR. Updated Review on Nocardia Species: 2006-2021. Clin Microbiol Rev. 2022 Dec 21;35(4):e0002721. doi: 10.1128/cmr.00027-21.
  5. Saubolle MA, Sussland D. Nocardiosis: review of clinical and laboratory experience. J Clin Microbiol. 2003 Oct;41(10):4497-501. doi: 10.1128/JCM.41.10.4497-4501.2003.

-Albert Budhipramono, MD, PhD, is currently a PGY1 Clinical Pathology Resident at the University of Texas Southwestern Medical Center in Dallas, Texas.


-Clare McCormick-Baw, MD, PhD is an Assistant Professor of Clinical Microbiology at UT Southwestern in Dallas, Texas. She has a passion for teaching about laboratory medicine in general and the best uses of the microbiology lab in particular.

-Andrew Clark, PhD, D(ABMM) is an Assistant Professor at UT Southwestern Medical Center in the Department of Pathology, and Associate Director of the Clements University Hospital microbiology laboratory. He completed a CPEP-accredited postdoctoral fellowship in Medical and Public Health Microbiology at National Institutes of Health, and is interested in antimicrobial susceptibility and anaerobe pathophysiology.

Beam Me Up, Scotty

Wouldn’t it be nice if the samples just magically appeared in the laboratory? Sometimes I wish we had a transporter like in Star Trek that could miraculously produce tubes in the rack already sorted and spun. The reality is, however, that we must rely on others to package and transport samples to the lab. Whether it’s blood, urine, body fluids, or even tissues samples, they make their way from the collection site to the lab.  If you work in a hospital setting, samples are delivered to the lab by one of two methods, a pneumatic tube system (PTS), or an internal courier.

  1. Although very convenient when they work, pneumatic tube systems have a few drawbacks. Tube carriers can quickly become an ergonomic safety concern if staff are not properly trained. It is best to limit the number of samples placed in a single tube as overcrowded tubes can be heavy and cause hand and wrist strains if not properly lifted. Sharps such as syringes or needles should never be transported via the PTS. The person opening the tube may not know they are in there and could easily receive a needlestick exposure. It is not a good idea to transport stool or respiratory samples through the PTS either. Specimen containers could open or break inside the tube carrier and give the recipient a not so nice surprise. Additionally, pneumatic tube carriers are known to aerosolize samples. If a spill were to occur, the pneumatic tube system would have to be cleaned or disinfected immediately. Most maintenance or facilities departments have special carriers designed to disinfect the system in the event of a spill. The hardest part may be getting staff to report the spill and initiating the proper cleanup.

    2. Some laboratory samples are walked down to the lab. Samples must be in a closed primary container and placed in a clean secondary container, usually a sample transport bag. Often, we see staff who are wearing gloves while walking samples to the lab. When asked, they state that they are carrying stool or COVID specimens and don’t want to contaminate themselves. The outside of the secondary container is considered clean, so there should be no need for gloves. Furthermore, if the gloves or outside of the transport bags are truly contaminated, these staff would be bringing contaminated items through the clean hallways of the facility. Then they would open the door to the lab, which is considered clean, with those same contaminated gloves. The Centers for Disease Control (CDC) has guidelines to mitigate the risk of bringing potentially infectious material into clean areas. The Core Infection Prevention and Control Practices for Safe Healthcare Delivery in All Settings document states that staff must “remove and discard PPE upon completing a task before leaving the patient’s room or care area”1. Another thing to consider is what happens if one of the containers leaks during transport. Or even worse, what if a spill were to occur? Small amounts of blood or body fluid can easily be cleaned with an absorbent and disinfectant. A larger spill, say a 24-hour urine jug, or a hazardous material spill like a tissue sample in a large container filled with formalin, would need more attention. Staff should be trained in how to handle large volume spills and transporters should take precautions, such as using a cart and having a spill kit on hand when moving hazardous material like formalin.

    Laboratory staff may not be the ones packaging and shipping samples to the lab, but they are often the recipients and have the responsibility to ensure they themselves and others remain protected. If staff should encounter specimen transport problem situations, be sure they have an effective pathway to communicate and escalate concerns. Often the staff sending specimens are not aware of the risks, so labs should provide that education- they will be thankful for it. Preanalytical processes are at the start of the road toward quality lab results, and everyone involved in each step should keep safe work practices at the forefront.

    1. Centers for Disease Control. CDC’s Core Infection Prevention and Control Practices for Safe Healthcare Delivery in All Settings. (2022). Retrieved from https://www.cdc.gov/infectioncontrol/guidelines/core-practices/index.html

    -Jason P. Nagy, PhD, MLS(ASCP)CM is a Lab Safety Coordinator for Sentara Healthcare, a hospital system with laboratories throughout Virginia and North Carolina. He is an experienced Technical Specialist with a background in biotechnology, molecular biology, clinical labs, and most recently, a focus in laboratory safety.

    Hematology Case Study: Brrrr, It’s Cold Outside!

    A CBC was received on a 70-year-old surgical inpatient at our facility and was run in automated mode on our Sysmex XN analyzer. On the first run, the analyzer gave flags for RBC agglutination and MCHC >37.5. These flags require evaluation of the high MCHC with investigation of a cold agglutinin, lipemia or icterus. A smear review for RBC agglutination was also indicated. The sample was incubated at 37°C for 30 minutes and the CBC was repeated. Results are shown below in Table 1.

    Table 1. CBC results before warming at 37°C and after 15 minutes incubation.

    On Run 2, the MCHC is now below 37.5, so there was no operator alert to incubate further or to investigate the high MCHC. This result was validated with the comment “37°C results, possible cold agglutinin.” However, there was still an RBC agglutination flag, a high MCV, and the hemoglobin and hematocrit still don’t look great, i.e. they don’t follow ‘the rules of 3’. We know that these rules are only valid for normal samples, but if we look at the previous results from 2 days ago, the Hgb 9.3 and Hct 28.4 did follow the ‘rules of 3’ and additionally, today’s results look like the patient’s hemoglobin has not changed but the hematocrit has dropped. The RBC did go up on the second run, but it is considerably lower than 2 days ago. The indicies are also inconsistent with the previous sample. “Hmmm…What could cause this?” Instead of validating, this is what you should be asking yourself.

    Cold agglutinins are known for causing pre-analytical and analytical spurious results with CBCs. With cold agglutinins, IgM antibodies bind to the RBCs after exposure to cold, causing RBC agglutination which leads to a classic pattern of false results. There is an increased MCV because the RBCs are clumped and sticking to one another, making the analyzer think these larger clumps are individual RBCs. This, in turn, will make the RBC count appear deceased because large clumps of RBCs going through the RBC aperture are counted as one RBC. The hematocrit is lowered because the volume of a clump is less than those cells individually. Hemoglobin concentration, on the other hand, is not affected by cold agglutinins, but because the hematocrit and RBC are falsely lowered, this makes the MCH and MCHC spuriously markedly increased. Cold agglutinins may be subtle, like this one, but some have extremely high MCHC and MCV, and extremely low RBC and Hct. Clues that you have a cold agglutinin are not only the high MCHC, but also flags from your analyzer such as “RBC agglutination”. The hematocrit will likely seem too low for the hemoglobin, and you may even see a hemoglobin that is higher than the hematocrit (yes it happens!) and RBC values so low as to be incompatible with life.

    The first thing is to do if you get these spurious results is to compare the parameters and instrument flags and decide if the results are consistent with a cold agglutinin. Other factors that may cause a high MCHC include lipemia, icterus, low sodium, abnormal proteins, hemolyzed samples and samples from patients with hemoglobinopathies. The patterns of result with these samples will show a high MCHC, but with a normal or low MCV, and you won’t usually see an RBC agglutination flag. A sample with cold agglutinins may also appear grainy or clumpy to the naked eye. With a suspected cold agglutinin, warming the sample for 15-30 minutes will allow the RBCs to disperse and improve the results. However, these results must be reviewed, and if there are still instrument flags and/or if there is still clumping, the results may not yet be corrected or ‘correct’. Be sure to review a smear from the tube before warming and after. The first smear confirms the presence of the cold agglutinins and clumping, and the second smear should confirm the resolution of the clumping after warming.

    This sample did have the characteristic grainy appearance of a cold agglutinin, and the post warming results did look a bit better, but the RBC agglutination flag was still present, and a review of the smear showed that the sample still had RBC clumping. After warming for another 30 min, the sample was quickly mixed and placed back on the analyzer. The results of this 3rd run are shown below, in Table 2.

    Figure 1. EDTA tube with RBC agglutination
    Table 2. CBC results on 3 runs. Run 3, after 60 min of incubation.

    Notice that hemoglobin has not changed as it is not affected by the cold agglutinins, but after warming for 60 minutes, the RBC, hematocrit and indicies all now look consistent with the previous sample drawn 2 days ago, and a review of the smear showed no RBC agglutination. These results from the 3rd run are ready to validate.

    Cold agglutinins are IgM autoantibodies that react best at 4°C but may also react at room temperature. They are generally not clinically significant and may be found in many healthy individuals. These natural cold autoantibodies occur at low titers, less than 1:64, and have no activity at higher temperatures. However, because they react at room temperature, they are notorious as a pre-analytical and analytical factor that causes spurious CBC results. They can also cause difficulties in Blood Banking during ABO/Rh typing and antibody detection.

    Cold agglutinins have various clinical manifestations. Benign cold agglutinins generally do not cause hemolytic anemia and need no treatment. Most benign cold autoantibodies have anti-I specificity, are polyclonal, low titer, and do not react above 30°C. Cold agglutinins associated with Mycoplasma pneumoniae, and infectious mononucleosis are usually clinically insignificant. In cases where they do cause hemolytic anemia, the antibodies are polyclonal IgM with normal κ and λ light chains. The anemia is acute and generally spontaneously resolves in several weeks without treatment.

    Though most cold agglutinins are benign and do not cause RBC destruction, when they do, they can cause hemolytic anemia that varies in severity from mild to life-threatening. This chronic cold agglutinin disease (CAD) is now known to be a form of autoimmune hemolytic anemia caused by a bone marrow lymphoproliferative disorder. Chronic CAD is a cold-autoantibody autoimmune hemolytic anemia (cAIHA) that is caused by an autoantibody produced by the clonal B cell lymphocytes. This antibody is usually monoclonal IgM with κ light chains and “I” or “i” specificity. These pathological cold agglutinins are high titer and usually react at 28°C to 32°C, and even up to 37°C. The highest temperature at which the antibodies continue to be activated is called the thermal amplitude. Because these can act at higher thermal amplitude, they may lead to CAD. In CAD the IgM autoantibodies bind to red cell antigens at 30-32°C, typically in the cooler extremities. IgM’s structure, a large immunoglobin pentamer, makes it an effective activator of the classical complement system. As the blood circulates to the central parts of the body, the RBCs warm up and the IgM antibodies dissociate from the RBC membranes, but the complement activation will continue, leading to RBC hemolysis and a cAIHA.

    Chronic CAD occurs most often in adults over 50, is more common in women, and produces anemia with varying severity. Patients may be seasonally affected. In the winter, the temperature of blood may fall below 30°C in the extremities, activating the cold agglutinins. Patients may experience acrocyanosis of the hands, feet, ears, and nose with exposure to cold. They may also experience other cold related symptoms such as numbness and Raynaud’s. Patients with chronic CAD and mild anemia are therefore monitored with a ‘wait and see’ plan and advised to avoid cold temperatures. In patients with more severe anemia, it is found that targeting the underlying lymphoproliferative disorder provides the best treatment. Rituximab has been used to achieve partial remission. Therapeutic plasma exchange is also used in severe cases to rapidly remove cold agglutinins.

    I have been thinking about cold agglutinins recently because of the number I have seen come into our lab this winter. As I am writing this, watching the temperature outside drop in anticipation of more snow coming in tonight, cold agglutinins came to my mind again. I used to live in the cold northern Northeast, but after moving further south, we see fewer cold agglutinins in hematology than I used to see. This winter we have had some cold spells, and, interestingly, I’ve seen more cold agglutinins. That led me to ask myself if cold agglutinin disease is really more common when patients are exposed to cold temperatures. I remember learning myself, and telling my students that that the treatment for mild to moderate CAD was to advise patients to move to someplace warmer. It has been assumed for many years that CAD worsens in colder climates or seasons. Interestingly, there have been a number of studies done since the 1950’s that examined the relationship of cold temperatures and CAD. The studies used hemoglobin, bilirubin and LDH for monitoring. Early case reports had findings that supported the theory of more anemia and higher LDH in the winter. (Dacie, Lyckholm)One recent article in 2022 found a 4-fold difference in the incidence of CAD between cold (Norway) and warm (Italy) climates. (Berentsen). However, atthe same time another study found that there was no statistically significant seasonal variation in hemoglobin, but that LDH levels were higher in winter. It concluded that these conditions should be monitored through all seasons because of the risk of hemolysis and thrombotic episodes. It was also demonstrated that though there may not be obvious statistical difference in CAD between cold and warm months, that there is a large variability of disease severity across patients and even with an individual patient. (Roth).

    In conclusion, when working in any department of the laboratory, quality results are important. Results on the patient chart that vary considerably from day to day because sometimes a cold agglutinin has been effectively resolved in lab testing and other days results after 15-30 minutes of warming are just reported without a good review of the smear and the parameters, are confusing, and could affect patient care. If one tech reports the results after 30 min incubation with values that are still spurious, and the next tech resolves the agglutination with further warming, the lab will be reporting out inconsistent results. A patient who actually has stable CBC results may have deltas and what appear to be erratic results. Cold agglutinins do take time to resolve, but with over 80% of samples autoverifying with the use of auto verification, we have time to work on these problem samples. If something doesn’t look or feel right about a sample, look at all the parameters, check the instrument flags and operator alerts, check the previous results and investigate any changes. It is important to review results carefully, because we want to report out the best results possible.

    References

    S Berentsen, W Barcellini, S D’Sa, U Randen, THA Tvedt, B Fattizzo, E Haukås, M Kell…

    Blood, The Journal of the American Society of Hematology, 2020•ashpublications.org

    Climent F, Cid J, Sureda A. Cold Agglutinin Disease: A Distinct Clonal B-Cell Lymphoproliferative Disorder of the Bone Marrow. Hemato. 2022; 3(1):163-173. https://doi.org/10.3390/hemato3010014

    Nikousefat Z, Javdani M, Hashemnia M, Haratyan A, Jalili A. Cold Agglutinin Disease; A Laboratory Challenge. Iran Red Crescent Med J. 2015 Oct 17;17(10):e18954. doi: 10.5812/ircmj.18954. PMID: 26566452; PMCID: PMC4636857.

    Patriquin, C.J. and Pavenski, K. (2022), O, wind, if winter comes … will symptoms be far behind?. Transfusion, 62: 2-10. https://doi.org/10.1111/trf.16765

    Rodak, Bernadette F., et al. Hematology: Clinical Principles and Applications. 5th ed. St. Louis, Mo., Elsevier Saunders, 2016

    Röth A, Fryzek J, Jiang X, Reichert H, Patel P, Su J, et al. Complement-mediated hemolysis persists year round in patients with cold agglutinin disease. Transfusion. 2022; 62: 51–59. https://doi.org/10.1111/trf.16745

    Socha-small

    -Becky Socha, MS, MLS(ASCP)CMBBCM graduated from Merrimack College in N. Andover, Massachusetts with a BS in Medical Technology and completed her MS in Clinical Laboratory Sciences at the University of Massachusetts, Lowell. She has worked as a Medical Technologist for over 40 years and has taught as an adjunct faculty member at Merrimack College, UMass Lowell and Stevenson University for over 20 years.  She has worked in all areas of the clinical laboratory, but has a special interest in Hematology and Blood Banking. She currently works at Mercy Medical Center in Baltimore, Md. When she’s not busy being a mad scientist, she can be found outside riding her bicycle.

    Lessons Learned During a Cytology Staffing Shortage

    No one wants to be short-staffed. Cytology programs across the country are either closing or shifting to a Master’s-only degree (to finally reflect our expanded scope of responsibilities), and during the pandemic, it seems there was a mass exodus of retiring baby-boomer cytologists. We’re in a crisis to say the least. As a prominent clinical rotation site, we have no shortage of cytology students. So much that whenever we’ve had an open position in the past, we were confident an eligible student would be able to fill our void. Over the past year, we’ve noticed that students had already secured jobs before they came to us for their clinical rotation. It wasn’t a problem until we realized that we were no longer immune to the nationwide staffing shortage. After one of our cytologists tragically passed away in November of 2022, we made do by working overtime. Before we were able to fill the empty position fifteen months later, another cytologist left to teach. Finally securing an amazing candidate with experience, we knew that we had students rotating through during the winter months, and things started looking up. We encouraged our first student to apply after being blown away by her already-fine-tuned her locator skills and hired her to start as soon as she graduates this summer. We were feeling assured that by the end of the summer (and my supervisor’s retirement), we would be fully staffed, fully trained, and ready to take on the world again. And then, another cytologist let us know she was moving to New England and her last day was five weeks from now. And just last week, another cytologist put in her notice. We’re down 4 cytologists in 15 months, the latter 3 within just 2 months. It’s the highest turnover our department has ever experienced, and our optimism was crushed. Fortunately, we do have more students rotating through this summer, but with 3 positions to fill before August, we’re treading water like our lives depend on it.

    Sound familiar? I’m certain that the pervasive staffing shortage is plaguing medical laboratories all over the country. But how do we not let this impact our services? How do we continue to provide the same level of exemplary care while preventing burnout in our team? I’d like to share some lessons learned during our shortage from both a management and cytologist perspective, and I’m eager to hear if you have any you’d like to share from your own experiences.

    Lesson #1 – Analyze Service Impact & Develop a Contingency Plan

    Will the staffing shortage negatively impact turnaround time? With CLIA’s maximum screening limit of 100 slides in no less than an 8-hour day, a reduction in cytologists shifts the burden of the workload which can risk exceeding limits. Factoring in non-screening activities, such as performing Rapid Onsite Evaluation (ROSE) for FNA procedures, sending out tests for ancillary studies (ThyroSeq, Afirma, HPV, etc.), accessioning, scheduling, slide filing, cleaning biopsy carts, compiling statistics for QA, assisting in the cytoprep lab, maintaining continuing education, etc., it’s far too easy to exceed those limits. We pride ourselves on a one-day turnaround time. Our clinicians and patients expect it, and we refuse to sacrifice that feat.  The most significant concern is the rising number of scheduled FNA procedures and not enough people to safely attend them all. We examined productivity and available time for FNAs given the number of cytologists present and daily case/slide workload. First, we looked at the number of slides that need to be screened for the day and divided it by the max mandated screening rate. Then, we counted the number of cases that need to be accessioned and the time involved. This process includes reconciling clinical history and histologic correlation, resolving the plethora of pre-analytical errors (please show us a perfect system for order entry). Considering the time spent on all other activities beyond accessioning and screening including assisting in the cytoprep laboratory, and what remains is the number of hours available for biopsies. We compare this to what has actually been scheduled for the day. Quite often, we are available for much less than what is requested and we must reallocate our resources. Postponing or reallocating out our prep assist duties, filing, and cart cleaning is an option with the cytoprep technicians also working overtime. If and when the prep techs are caught up on their work, they are able to clean carts for us. As for filing slides and paperwork, try to utilize your hospital’s resources, such as volunteers, who are incredibly valuable. Try to also share or reallocate statistics or other QA activities to reduce the burden on one employee while still maintaining operations. You could hire a temporary administrative assistant with a background in medical terminology to assist with accessioning as another option. The worst case scenario would be asking clinicians to “self-collect” FNAs in a balanced salt solution and sending it up to the lab to be processed. Our clinicians value our ROSE services, especially to confirm viability and to ensure we have sufficient material for ancillary studies such as molecular, IHC, and flow cytometry, and not being present would be an ethical dilemma for us all. To help mitigate this, we worked with the schedulers and clinicians across various departments to level out the biopsy schedule, and we postponed or reallocated non-screening activities to be able to handle the FNA workload to the best of our staffing level.

    Lesson #2- Go LEAN

    Now is a great time to go LEAN, if you haven’t already. And if you think you have, do it again. Analyze your lab for forms of waste. Are there non-value-added activities that are interfering with daily operations? Is your workflow optimized? How much of your cytologist’s time is spent waiting on biopsies? Waiting to call the cytologist to the procedure after the clinician has scrubbed in and marked the targeted lesion could save the cytologist 10-45 minutes of time. By reducing excess and unproductive biopsy wait time, the cytologist can be more productive within the laboratory. You could also reduce motion waste by having one cytologist attend multiple biopsies in the same department within a short time frame. For example, if an ultrasound-guided biopsy is scheduled for 10:15 AM and a CT-scan biopsy is scheduled for 11:00 AM, the same cytologist could attend both without having to return to the lab just to be called back down to radiology. Reducing excess employee movement between departments can also reduce potential care delays by having the cytologist present, moving with the nurses and proceduralist. Similar to the previous lesson on developing a contingency plan with reallocation of resources, how much of the cytologist’s talent is wasted on miscellaneous tasks that outside of the scope of high complexity testing, such as filing, scheduling, and cart cleaning? These are tasks that could be easily assigned to an administrative assistant or prep tech. And lastly, is the lab “over-prepping?” Many hospital laboratories only produce one liquid-based preparation (such as a ThinPrep slide) for morphology and a cell block for ancillary studies. If you are also making cytospins and smears or other additional preparations that offer a higher level of quality than is actually required to make the diagnosis, it could be considered waste. To reduce supply costs and time spent both prepping and interpreting excess material, monitor the laboratory for overproduction and overprocessing waste. This is especially helpful in reducing turnaround time and freeing up existing resources for other tasks.

    Lesson #3 – Promote Mental Health & Self-Care

    I especially thank my supervisor for this lesson because he and our cytopathology director have always maintained the family-comes-first and quality-of-life philosophies. Recognize that you and your cytologists are humans and not automated machines. Working in a short-staffed state with an abundance of overtime for more than a year can quickly manifest in burnout. You have to protect the gems that you still have. One thing I learned from my supervisor is to continuously seek feedback. How can we prevent burnout and protect both our mental and physical well-being? The main concern was quality of life, which was flourishing when we worked 4-10’s. While the overtime is not mandatory, we had to switch back to a 5-day work week to compensate for the staffing shortage. With that said, the remaining cytologists feel a sense of duty to our patients and therefore have extended their days to 9- to 10-hour days 5 days per week just to cover basic laboratory operations. We anticipate that once our March-start cytologist is fully trained to handle biopsies which run afterhours and our June-start cytologist is fully trained on accessioning, we can return to the 4-10 workweek. But for now, we maintain morale by knowing that the future is bright and we have 3 exceptionally strong senior techs remaining who are fully prepared to train any new hires. While management responsibilities have also shifted during a staffing shortage, a good leader must sharpen their intuition and emotional intelligence, checking in with their employees who are under extreme stress. Too often the manager forgets to check in with themselves while weathering a storm.  Remember the airplane oxygen mask metaphor – you must care for yourself before you attempt to help others.Make sure your employees know that too. Patients and their specimens need us, but we cannot provide exceptional services unless we take care of ourselves first.

    Lesson #4 – Communicate Intentions & Goals Early & Often

    Communication- It’s a two-way street. Please, for everyone involved, consider giving MORE than the minimum required notice. For our department where we clearly do much more than just screening slides and attending FNAs, you must leave enough time to train others on how to handle the processes you own, such as send-out tests or statistics. It is crucial to give the remaining cytologists sufficient time to learn these processes and be able to ask questions while you’re still onsite. Communicating your intent to resign earlier than the minimum required time also enables management to shift their duties and either actively recruit or simply consider prospective candidates to help close the gap. Please also understand that indicating your intent to leave a laboratory does not mean that management will give up on you during your remaining tenure. If anything, leadership will ensure that you are able to accomplish any residual goals within the organization and help you prepare for the next stop on your journey. This principle applies to the entire duration of your career within the laboratory. At the beginning of your tenure, be open and honest about your short-term and long-term goals both career-wise and outside of the workplace so that management can help you customize a plan to achieve those aspirations. Should your goals or intentions change, be transparent. Pivoting is not a form of weakness. While it isn’t easy to brave a storm, especially as the effects of the shortage are exponentially more evident, it’s not only okay to seek help, but strongly encouraged. If you feel overwhelmed or on the verge of burnout, lean on your team members, communicate your concerns to your manager, and take time to ground yourself. Sometimes leaving a laboratory only reduces familiar burnout, and by starting over elsewhere, the unfamiliar may turn out to be more stressful, yet sometimes that new challenge is exactly what you needed. Just keep in mind that the storm will not last forever, and the laboratory sun will shine again.

    -Taryn Waraksa-Deutsch, MS, SCT(ASCP)CM, CT(IAC), has worked as a cytotechnologist at Fox Chase Cancer Center, in Philadelphia, Pennsylvania, since earning her master’s degree from Thomas Jefferson University in 2014. She is an ASCP board-certified Specialist in Cytotechnology with an additional certification by the International Academy of Cytology (IAC). She is also a 2020 ASCP 40 Under Forty Honoree.